
Chapter 9 · The finished frame

Part 2 · Stills
Every film here starts as a still. Before anything moves, speaks or is cut, someone has to make one frame that is right: the right face, the right room, the right instant, lit the way the film is lit. This chapter teaches what a finished still is, whichever tool makes it: the twelve elements in their order, the numbers that go beside their results, the instant you freeze, the finish, and what to do with a frame that comes back 80 % right. It then teaches the keyframes that motion needs, the boards and key visuals that carry an idea, and how a frame is signed and handed on.
In this chapter
What the stills stage decides, and where each decision lives: the shot record, the prompt or the settings
The finished grade and the test grade, and when each is right
The twelve elements of a finished still, in order, each with its purpose
Numbers beside results, the frozen instant, the frame inventory, the finish, exclusions and length
Which tool for which job; reading what comes back; repairing a frame until you can sign it
Keyframes for motion: start frames, speaking frames, contact states, start and end pairs
Boards and key visuals
Signing a frame and handing it on
Before you start. Chapters 5 to 7 supply the decisions the twelve elements settle: the camera (5), the light and colour (6) and the world in the frame (7). Chapter 8 teaches the records that stand beside every frame. Chapter 10 teaches the pictures you attach to a frame, and how to change a frame you have approved. The tools are Chapter 11 (Nano Banana Pro) and Chapter 12 (GPT Image 2.5); each maps this chapter's anatomy to its own dialect.
9.1 What this stage decides, and where each decision lives
The stills stage makes the pictures the rest of the film is built on: the masters of faces, rooms and products, the keyframes that video models animate, the inserts, the boards and the key visuals. You decide what each frame must be, and you sign it. Whoever runs the tool writes to your record, runs the job and hands you the returned file; nothing is signed on the strength of a prompt, only on the file. The gates that apply are Chapter 8's: the spend gate before a run, the rights gate before a real face or a brand mark is used, the acceptance gate when you sign.
You arrive at a frame with a great deal in mind: what the moment means, the lens, the stop, the palette. Each decision has one home.
The shot record | The prompt | The settings | |
Who reads it | you and the crew | the model | the interface |
What it holds | the intention and emotional beat; the reason for every planning number; the palette plan; the mid-action status; the levers; the declared length band | the physical result, as a camera would see it, with each number beside the result it should give; the purpose of the frame, in the first sentence | the model, the resolution, the aspect, the variants, the pictures attached |
Example | "release after contained pressure" | "jaw set, nostrils flared, eyes fixed on a point beyond the frame" | 16:9, 2k, one variant |
The shot record is never pasted into the prompt. The model cannot read it, so anything the frame must show has to be in the prompt as well as in the record. "Emotional beat: quiet awe" is not something a camera can see; "eyes down on the tea, mouth closed and relaxed" is. There are two sanctioned exceptions to "only what a camera sees". The opening sentence may say what the frame is for, phrased physically ("a hero frame for a premium athletic-wear commercial"): Google recommends stating the purpose of an image, and this form is a house rule (July 2026). And the camera and the light go in as numbers, with the visible result beside each (9.3). Story meaning and emotional beat stay in the record.
The settings hold everything the interface controls. Writing "8K", "16:9" or "vertical" into the prompt sets nothing: at best it is ignored, at worst it fights the real setting and the frame comes back in the wrong shape.
Palette. Many directors plan colour as a 60/30/10 split: about 60 % of the frame in a dominant colour, 30 % in a secondary one, 10 % in an accent. Plan it in your record. Write it into the prompt as proportions on named surfaces ("charcoal, warm skin and track red, with a teal accent"), never as the string "60/30/10", which no maker documents as an instruction.
Two grades, and when each is right
Every frame you write is written to one of two grades.
Finished grade | Test grade | |
For | a frame that will be delivered, signed as an anchor, animated into a clip, or shown to a client as the look | proving a route, a look or a physical state quickly and cheaply; a board; a first read of a room |
It settles | every element the shot needs (the twelve below), with numbers beside their results | the essentials: what the picture is, the subject and its frozen instant, the place, the camera and light in words, the closing line |
Length | 400 to 600 words for a complex hero still with a face; the band is declared for each shot | roughly 60 to 200 words (a working figure) |
It proves | a frame the film can be built on | that a route works, never a finished look |
The finished grade is the standard this book teaches. The test grade is a shortcut with a purpose. It is never the model of a finished frame, and a test-grade frame that looks good has only earned the right to be rewritten at finished grade before anything is signed.
9.2 The twelve elements
Neither Google nor OpenAI requires an order; each lists the decisions a prompt should make. The order this book teaches, a house rule since July 2026, is world first, photography second, technical close. It puts the medium first, where it colours everything after it, and it is the order the Mastorna stills were written in (Chapter 35). The elements are an order for writing and for checking. Inside the prompt they run together as one paragraph, with no labels, bullets or headings: a photographic still is one prose paragraph, and keyword lists and JSON show no advantage. (A layout-led or text-heavy brief on GPT Image 2.5 may use labelled sections; Chapter 12 says when.)

Figure 9.1 — The twelve elements of a finished-grade still, in the house order: world first, photography second, technical close. The words beside each element come from a commercial hero frame of a sprinter leaving a stadium tunnel.
1. Operation, medium and purpose. Purpose: fixes what kind of picture this physically is, so that every later noun renders as a photograph of that kind. Say what the image is (a photograph, a digital-cinema frame), its era or production context, its capture (a film stock, a sensor look), its colour regime, and what it is for: "a black-and-white photograph from a 1966 Italian film", "a digital-cinema frame from a premium athletic-wear commercial". On an image tool the tool fixes the operation, so the medium opens the prompt; in a chat window, put one operation phrase first ("Create a black-and-white photograph from a 1966 Italian film of …"). "Photorealistic" or "a real photograph" is fine as one medium word. Stacks of quality words ("8K, masterpiece") describe nothing.
2. Subject and frozen instant. Purpose: says who or what is in the frame, how many, how large, and at what instant. Give the exact number of people and the subject's share of the frame height. If the shot will move, the instant is frozen here, with its phase written as positions (9.4). If nothing moves, say that the frame is held still. If the shot will speak, write the state of the mouth: lips fully visible, both corners clear and lit, neutral or barely parted (9.10). If the shot will move, write the room left in the frame for the move: a start frame shows where the clip begins, never where it ends.
3. Identity clause. Purpose: holds the face in words when a picture is only one signal among several. For a person, the forensic description of the face: hairline and part, brow, the set of the eyes and their asymmetry, nose, jaw, skin, expression lines, grooming. Write six to ten fixed facts, asymmetries first ("the left upper lid fractionally heavier than the right"); a face written from asymmetries stays the same face, and one written from a type ("handsome Italian man") drifts. Write the clause once, from the approved master, store it and paste it; never retype it. When pictures are attached, the manifest and the locked clause come first (10.5), and you do not write the face twice. A real actor's name in this element is a rights decision made once for the whole project (10.8).
4. Wardrobe and prop truth. Purpose: makes the continuity-critical objects checkable. Material, wear and state, as things you could verify: "a fabric race bib slightly curled at one corner", "worn track spikes with fine abrasion at the toe box". Every noun is something you will look for on the returned frame. A prop that must recur is described in full every time.
5. Frame inventory and edges. Purpose: leaves the model nothing to invent. Foreground, midground and background, and what touches or leaves each edge (9.4).
6. Environment and material truth. Purpose: defines the space by its systems and materials instead of its mood. Architecture, surfaces, fittings, deliberate wear. For a place that recurs, add a geography sentence that fixes the shot against the place's fixed landmarks (10.10). Text that exists in the world (a shop sign) is production design: name its language, script, era and wear, and let distance set its legibility. Text laid over the image is never generated; it is set in post (10.12).
7. Must-show anchors. Purpose: puts the continuity items into this frame. Take them from the continuity plan and the record's source-lock check. If the story needs it visible, name it; never assume it.
8. Camera placement. Purpose: fixes where the lens sits and what it keeps sharp. Placement, never movement: height, distance, angle, lens and stop, and the framing offset, each with its result (9.3).
9. Light. Purpose: makes the frame's light a decision instead of a default. Every source: what it is, where it sits relative to the camera, hard or soft, its Kelvin, and what it does to a named surface. Name the fill by the surface that causes it. Give one contrast ratio, with its reason in the record. Every source has a reason in the world (a window, a bulb, headlights) unless the project declares an exception.
10. Atmosphere. Purpose: describes the air only where the air would show. Haze in a beam of light, dust at a threshold, breath in cold air, rain mist.
11. Finish. Purpose: gives every frame of the film the same photographic character. Written as capture, not as damage (9.5).
12. Exclusions, then the closing line. Purpose: locks the drifts you expect, and keeps the overlay layer out. At most five exclusions, then one closing line (9.5).
State an adult's age in words when it matters ("in her early forties", "fifty-eight"), and never as a trick to get past a content filter.
Written out in order, the twelve elements make a fill-in template. Each tool section prints its own (11.4, 12.4), because the order stays and the dialect changes.
9.3 Numbers beside results
At finished grade you write the camera and the light as a specification: height, distance, lens, stop, the subject's share of the frame, a Kelvin figure for each source and one contrast ratio. Then you write, beside each number, what it should show.
A camera and a light are decided in numbers on a set, and neither maker forbids them: Google's own example asks for "a low-angle shot with a shallow depth of field (f/1.8)", and OpenAI's portrait example asks for a 50mm lens. OpenAI's warning belongs beside the rule: "Treat camera specifications as cues for appearance, not a guarantee of exact physical simulation." A number is a cue for the look, so the result is written beside it and no number carries a decision alone. The reason for the number stays in the shot record.
Numbers are cues for the look, never the only carrier of it. Put each number beside the visible result it should give. At test grade, words alone are enough ("a low warm bulb, a portrait lens feel").
The number | What it decides | The result written beside it |
Camera height and distance | where the lens sits and how near it is | "in the aisle at seated eye level"; "0.9 meters, 4 meters from the subject, angled slightly upward" |
Lens and stop | how wide the view is, how shallow the focus | "a 75mm spherical lens at T2.0, holding her sharp while the stadium dissolves" |
The subject's share of the frame | scale, and who carries the image | "roughly 40 percent of the frame height, framed left of center and carrying the image's visual weight against the tunnel's dark mass" |
Kelvin, for each source | the colour of each light | "Morning sun from camera right at approximately 5600K rims her arm and cheek; the tunnel's caged lamp behind her burns warm at approximately 3200K as a motivated practical" |
The contrast ratio | how far the shadow side falls below the lit side | "overall contrast sits near 4:1 with hard-edged shadows on the tunnel floor and soft fill from the sky" |
Three practical points follow.
Units. Height and distance can be in real units ("one hundred and ten centimeters from the cabin floor") or in body and furniture units ("an arm and a half away", "from the tea glass up"). Either fixes a camera.
Kelvin is the scale for the colour of a light: warm tungsten bulbs sit near 3200K, daylight near 5600K; give every source its own figure. Name a source by its role in the world (a bulb, a window, headlights, a caged work lamp), not by equipment: a light named as a piece of equipment can turn up in the frame as an object. The ratio is chosen for a reason, and the reason goes in the record: 3:1 where two faces must both read, 5:1 or 6:1 in wet night frames, 2:1 in deliberately flat daylight.
9.4 The frozen instant, and the frame inventory
The frozen instant
A still that will be animated must be a moment of the movement, not a pose. Freeze the action early, about 20 to 40 per cent of the way into it: early enough that the destination is still open, late enough that momentum is undeniable. The frame must carry evidence of direction for each system that will move: weight moving onto one leg, a torso leaning past its base of support, cloth mid-swing, dust or spray hanging in the air, a grip mid-change, breath visible, a gaze halfway between two named targets. Freeze two or three independent systems, not one, because the video model continues what the frame already shows moving. Too early, and the clip opens on a photograph waking up; too late, and the clip has nothing left to perform.
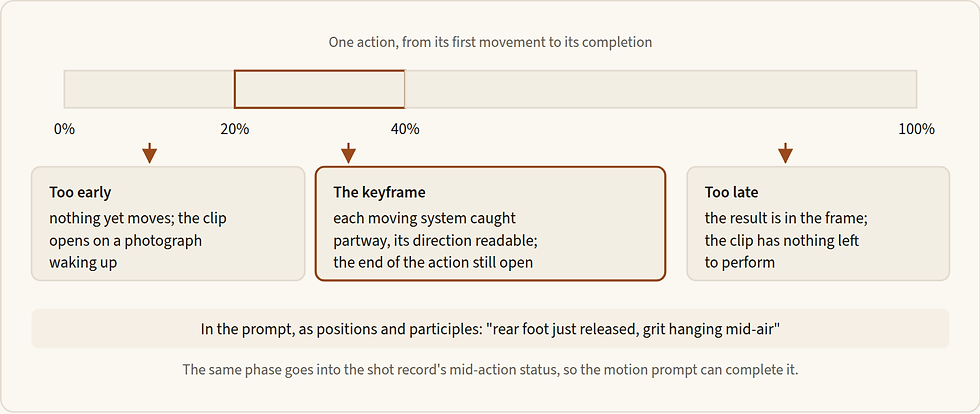
Figure 9.2 — The freeze. A moving shot's keyframe sits 20 to 40 per cent into the action, with the direction of every moving system readable in the frame. Earlier, the clip starts by waking a photograph; later, the frame has already used up the action.
Write the phase as positions and participles, never as an open verb. "Her rear foot has just broken contact with a visible scatter of grit hanging mid-air" fixes an instant. "She sprints out of the tunnel" does not: the verb leaves the phase open, and a model asked for movement inside a still may return smeared limbs or a frame caught mid-warp. A verb is not banned as such; Google's own prompts say "mid-stride" and "mid-spin". The fault is a verb that leaves the phase open.
Four more rules follow from the same reason.
Camera-movement words never appear in a still. The camera sits; it does not move.
Contacts are readable and physically possible. Never freeze an impossible contact pose only to look dynamic. A hand is either clearly on an object or clearly a hand's width from it.
Identity and motion do not share a clause. Say who someone is in one sentence and what a limb is doing in another, so that the model does not blend the two.
A start frame shows the state the clip begins in, never its end, with room left in the frame for the move (9.10). If nothing moves, declare the shot STATIC in the record and compose a held frame: stillness is a decision, never an accident.
The record and the prompt must agree. The phase is written twice: into the prompt as positions, because the model never reads the record, and into the record's mid-action status, because the motion prompt has to complete every system the frame froze. A record that lists "fingers mid-tap, chest mid-breath-rise" over a prompt that says only that a hand "rests near a case" promises what the model never reads (Example 9.1).
Frame inventory and edges
A picture has planes, and any plane you do not name is left to the model to invent. For any shot with more than one plane, name the foreground, the midground and the background, and say what touches or leaves each edge of the frame. Edge control stops amputated props and faces that appear by accident at the border. The sprinter's frame does it in one sentence: "In the foreground the tunnel's concrete edge cuts the lower left corner as a soft dark shape; in the midground she breaks the threshold between shadow and light; in the background the empty stadium curve sits defocused, its rows reading as texture with no legible signage."
Give scale as a share of the frame's height, or as what the frame cuts through ("from the tea glass up"). A whole landscape can be given as shares: "the cathedral occupying the dominant vertical center of the composition at approximately forty-five percent of frame height, the cobblestones and vehicles at the base filling thirty-five percent, and the flanking buildings creating walls on either side." A frame with no person states its weight as placement: thirds, a bracket, a dark mass against the subject. In a crowd, vary the faces (10.9). OpenAI says that for wide, cinematic, low-light, rainy or neon scenes you should specify scale, atmosphere and colour instead of relying on mood words alone (checked 30 Sep 2026).
9.5 The finish, emotion, exclusions and length
The finish describes capture
The finish closes the photography, and it is where a prompt most often stays vague. "A still from a quiet drama" names a genre, not a finish; "8K, masterpiece" describes nothing. Write each part of the finish as behaviour:
the character of the stock or sensor;
the grain, kept fine and restrained, by tonal zone (finer in the highlights, coarser in the shadows);
the base tone;
halation, the glow around a bright source, and where it blooms;
the character of the lens at the edges of the frame;
what stays sharp and what dissolves.
For colour work, add the grade as colours on named surfaces; for monochrome work, a tonal instruction in place of the colours. Name a stock only if its name implies a visible look, and check that the name is real for the era and the medium: a colour-process name does not belong on a black-and-white stock. Kodak's Vision3 250D implies daylight balance, reduced grain and a wide highlight range; CineStill's red halation comes from a missing anti-halation layer; a camera-body name implies much less.
The finish block describes capture, and delivery texture comes later. The block gives this frame its photographic character so that every frame in the film matches. It never asks the generator to age or damage the image ("fake old film"). The grain and halation the audience finally sees are a second layer, the delivery texture: added last, in post, at final resolution, and matched across every shot and graphic (Chapter 30). The Mastorna trailer worked this way: fine grain and restrained halation were added in post, and no model was asked to fake old film (Chapter 35).
Emotion, exclusions and the closing line
Emotion becomes muscle, light and matter. The model renders those, not adjectives of feeling. "Full exertion" becomes "jaw set, nostrils flared, eyes fixed on a point beyond the frame"; a barely there smile becomes "the corners of her mouth lifted barely two millimeters". Any interpretive phrase sits beside a measurement like that. "Cinematic" is never used alone: say the format, the lens or the grade you mean.
Positives first. Describe the world as it is ("an empty, deserted street with no signs of traffic", not "no cars": Google's advice; OpenAI's is to specify scale, atmosphere and colour rather than rely on mood words). Then add at most five exclusions, each aimed at a drift you expect. Every world drifts towards its genre: a 1960s cabin towards plastic overhead bins, a Cairo street towards glass signage. Do not write an exclusion that names an emotion ("no friendly expression"): it hands the model the idea. Do not stack negatives.
Then one closing line, outside the five: "no overlaid text, subtitles, logos, or interface graphics". It bans the editorial layer only. If the frame carries a shop sign, never write "no text": the sign is production design (10.12).
How long
There is no floor and no ceiling. A prompt is finished when every element the shot needs is settled, and too short when an element it needs is missing. Neither maker sets a limit, and both say that more detail gives more control. What has been measured is narrow: the 32 finished still prompts of the Mastorna trailer ran from 390 to 598 words, median about 500 (Chapter 35). From that and from craft come three working bands, declared for each shot in the record:
Kind of frame | Words |
A complex, identity-bearing hero still that settles all twelve elements | about 400 to 600 |
A single-subject insert, or an environment | about 150 to 300 |
An edit of an approved frame | about 40 to 150 |
Only the first band is measured; the other two are working figures. Below the band, look for a missing element. Above it, look for repetition, and cut it: every sentence should constrain a pixel, a relationship or a decision. For a scene too complex for one pass, Google's staged build ("First, create a background …") is the maker's alternative, at the cost of the drift every edit brings (9.9).
From Mastorna, corrected · Film trailer · Nano Banana Pro, text only, made at 16:9 and cropped to 1.85:1 · five passages of the 644-word establishing frame · corrected for this book; not run
Example 9.1 — the establishing frame: where a record's promises enter the prompt
The whole frame is printed in full as Example 11.5; these are the five passages that teach the point. First, the opening sentence: the brow, the mouth and the gaze in place of a state word.
A black-and-white photograph from a 1966 Italian film, capturing a lean Italian man in his early forties modeled on Marcello Mastroianni circa 1965 seated in a 1960s commercial airliner window seat, his body slightly reclined, the brow smooth and the mouth slack, his eyes caught mid-drift toward the oval aircraft window on his right, the head turned only a few degrees that way, where pale clouds are visible outside.The hand, with the record's fingers written as a position:
His left hand lies on the armrest beside a large dark hard-shell cello case propped upright in the adjacent seat, the index finger lifted a finger's width and the middle finger just touching down, caught mid-tap, the case showing scuffed corners and tarnished metal latches from years of use, its curved body following the shape of the instrument within.The sleeping passenger, with the record's breath written as a position:
one sleeps with a cloth sleeping mask over their eyes, the chest caught a little raised at the top of an in-breath, another reads a folded newspaper.The finish, with a stock name that is true for a black-and-white print:
The image has the tonal quality of a 1960s black-and-white release print, with fine organic silver-gelatin grain that is slightly finer in the brighter highlight areas and marginally coarser in the shadow areas, a faint warm ivory base tone inherent to the film stock, rich mid-tones dominating the cabin interior, natural halation blooming softly around the bright window, and slight optical softness at the edges of the frame characteristic of period spherical lenses while maintaining sharp focus at center.The exclusions, ending on the fixed closing line:
No color, no modern aircraft interior details, no digital sharpness, no plastic overhead bins, no overlaid text, subtitles, logos, or interface graphics.Why it works
Every system the shot record names as frozen now sits in the prompt as a position a clip can continue from: the finger a finger's width off the arm, the chest at the top of the breath, the eyes mid-drift.
Copy the muscle line: "the brow smooth and the mouth slack" says what the muscles are doing, where "distracted" names a state the model must guess.
Copy the finish and the ending: grain by zone, a base tone, halation where the window blooms, softness at the edges, and a stock that existed; then four drift locks and the closing line.
9.6 The test grade, and when it is right
The test grade keeps the essentials and leaves the rest to the model. Write element 1 (what the picture is), element 2 (the subject and its frozen instant), element 6 (the place), element 8 as words (a portrait lens feel, an arm and a half away), element 9 as one named source, and the closing line: roughly 60 to 200 words, a working figure. Leave out the forensic clause, the inventory, the numbers, the must-shows, the atmosphere, the detailed finish and the extra exclusions. Never leave out the frozen instant, the light source or the closing line.
When it is right: proving a route (does this model give me this kitchen at all?); a first look at a room or a costume; a board; a check on a physical state; a look frame for a treatment before a budget exists; an insert with no recurring person.
When it is wrong: any frame you will sign as an anchor, animate into a clip or show a client as the look, and any frame that carries a recurring face. A test-grade frame that is good has earned a finished-grade rewrite, which you do before you sign anything.
A test-grade paragraph runs in this order: who (age, build, one visible marker); where they are and the instant as positions; the shot size and face angle, with the mouth closed and relaxed if they will speak; hair and wardrobe in material words; the only light, its effect and where the background falls; one or two worn objects; one specific skin fact; the lens feel and the depth of field in plain words; the closing line.
Read a test-grade paragraph by what it leaves to the model: the lens and stop, any Kelvin figure or ratio, the planes, a clause for the face beyond age, hair and lines, and a finish beyond a genre. The model supplies all of those unasked, and it will supply them differently in the next frame. That is acceptable for proving a route and wrong for a frame the film is built on. Character adjectives ("precise, dry, composed") are a test-grade habit too: at finished grade they become posture, hands and wardrobe.
9.7 Which tool for which job
Two tools make stills in this book. Nano Banana Pro is Google's image model (its maker id is gemini-3-pro-image); GPT Image 2.5 is OpenAI's, in two variants, Flare for speed and Sunburst for quality and editing precision (both checked 30 Sep 2026). Each has its own section, and each maps the twelve elements to its own dialect.
Job | Tool | Where |
A photographic keyframe from text; the default | Nano Banana Pro | |
A signed identity carried across several references; an anchored keyframe, a start and end pair, a contact state | Nano Banana Pro | |
A transparent-background element | GPT Image 2.5 | |
A text- or layout-led frame, a diagram, a key-visual study (type that ships is set in post) | GPT Image 2.5 | |
A bounded edit of a frame that carries no signed face (Sunburst first when precision matters, Flare for speed) | GPT Image 2.5 | |
Fast exploration | GPT Image 2.5, Flare | |
A photographic keyframe that fails twice on one tool | the same brief on the other | Chapters 11 and 12 |
The last row is a tactic, not a ranking: no source compares the two on photographic keyframes made from text. Name the model in every request; a platform's default is a setting to override. The host platform's own relight, outpaint and background-remover tools are not used, because none names the engine that runs it.
9.8 Reading what comes back
A frame is judged twice, at two sizes, because it fails in two different ways.
First at the size it will be seen. Does the person read as themselves? Is the silhouette clear? Does the frame read in the time the cut will give it? Check this first.
Then at full size. Eyes, ears, teeth, hands, closures, labels. For a master, look at the face at 200 %. For any later frame, compare its face at 200 % against the master (in a film whose in-look anchor stands in for the master, against that anchor), never against another frame made from it: faces drift in small steps, and a copy of a copy hides the drift. Then read the frame against its prompt, element by element. Is every frozen system visible? Does the depth of field match the lens you wrote? Do the shadows fall as the ratio says?
Before you sign a still
The person reads as themselves at the size the frame will be seen; face, hands, teeth and closures are checked at full size, and a later frame's face at 200 % against the master.
Age, wardrobe and jewellery match the words.
Every frozen system the record names is visible, in the phase the prompt gave.
Every light is in the state the prompt asked for, and the shadows fall as the ratio says.
Objects are in the state the shot starts in.
No stray printing or logos on "plain" objects and screens.
The frame came back in the aspect and resolution you set.
Here is what goes wrong most often with a first frame, why, and the smallest fix.
You see | Why | Smallest fix |
A light is on that should be off | the state was mentioned once, and as a negative | an edit of that frame that says it firmly and names the only light |
An object you never asked for | a surface was left unnamed | name every surface and what sits on it; describe emptiness as a surface ("the oilcloth between the laptop and her is bare") |
Plastic skin | no skin facts | one to three specific ones: pores, sheen on the nose, the lines from nose to mouth |
The face is acting | an emotion adjective | describe the muscles, or write "her expression does not change" |
The room goes teal and orange | a grade word, or "cinematic" | delete it; name three real surfaces and their colours |
A younger, prettier face than you wrote | the face was written from a type, not from asymmetries | put the fixed facts early, asymmetries first (element 3) |
The frame comes back in the wrong shape | an aspect written in the prompt fights the setting | keep the aspect out of the words |
Two attempts, then change the lever. If two rewrites fail the same way, more adjectives will not help. Change what you give the model: make a one-change edit of the best attempt (9.9); run the same brief on the other still tool, a cheap tactic and not a claim that it is better; or make a blocking photo, or photograph the object, and attach it (Chapter 10).
9.9 Repairing a frame until you can sign it
A frame that is 80 % right is worth more than a fresh roll. A re-roll renegotiates everything: the face, the light, the instant you liked. An edit keeps them. This section teaches the order of repair and the point at which words stop helping and you must change what you give the model. Chapter 10 teaches the edit itself (10.13).

Figure 9.3 — The repair steps. Choose the step that fits the problem (the labels above the arrows); to remove a logo or a mark, go straight to post. Within any step, two failures the same way mean it is time to move on.
What the makers say. Google: for an edit, "be direct and specific"; complex edits and blends, lighting changes among them, can produce unnatural artifacts. OpenAI: say "change only X", list the details to preserve, and because "repeated edits can still change details you intended to preserve", inspect each result; if a region must stay pixel-identical, composite the approved edit into the original image rather than rely on prompting.
The one-change edit is the first tool. Use it when the face, the hands, the light and the instant are good and one thing is wrong: a garment, a prop's position, a light that should be off. It is not for a wrong face (go back to the identity picture, Chapter 10), a product whose shape is wrong (10.11), a frame that is structurally wrong (make it again), or an unsigned draft with several things wrong (the controlled revision, next).
The controlled revision. When more than one thing is wrong, or the problem is not yet clear, decide two things before you write: what exactly you are delivering (a finished shot, a sheet, an empty room, a prop, a reverse angle, a local edit), and what the change is allowed to move. A change always moves something: a new light must move shadows, a new garment must move folds. So state the change, the effects it is allowed to cause (a relight may move shadows, reflections and exposure; a garment, its folds and contact shadows), and what stays authoritative (geometry, identity, positions). Then generate, and compare the changed and supposedly unchanged areas.
A signed frame takes one change at a time. An unsigned draft may take two corrections in one edit; if only one lands, split them.
The composite in post is the cheapest repair, and it costs no credits. Stack the parent and the edit as layers at the same size; align them first if the camera moved; mask in only the area that changed; feather the edge and match the grain; check the seam at 100 %. The parent keeps every pixel you already approved. To remove something (a logo, faint printing, a mark), clean the area in post before you think of prompting, and restore the grain.
After every step, put the parent and the result side by side at full size and list what moved. Both makers warn that edits drift, and naming a detail does not always stop it moving: expect drift, look for it and decide whether the cut can live with it.
Words stop being useful at a recognisable point. Keep this table beside you.
Defect | First useful action | Stop prompting when | Hand on to |
A small unrelated mark on a plain wall | clean it in post, or a narrow edit | repeated edits start moving the actor or the product | the original with an approved patch |
The wrong face in an otherwise right scene | go back to the identity picture; remove competing faces | the face still differs in a view that matters | a new accepted frame, or another tool |
A wrong grip or contact | correct what supports what; add a blocking photo | two attempts repeat the same contact | a new keyframe, or different coverage |
A product the wrong shape | attach real front and side photographs | the model keeps redesigning it | the photographed or composited product (10.11) |
Fine type wrong | correct it once or twice | the delivery needs exact text, or two tries failed | real artwork composited on a clean surface (10.12) |
The stop rules, in one place.
Two attempts at one failure, then change the lever: edit, then post, then another tool or method.
Change the evidence (a picture, a blocking photo), not the adjectives.
Never edit an edit that is drifting; go back to the last signed frame.
A real person's face that drifts is a hard failure: the frame is rejected, however good the rest is.
In-world Arabic text that is wrong twice gets a blank panel, and the text is composited in post (10.12).
9.10 Keyframes for motion
A keyframe is a still made to be animated by a video model: the clip starts from it, and sometimes ends on a second one. It is the most demanding still you will make, because every mistake in it moves.
The keyframe owns everything that exists; the motion prompt owns everything that changes. The still settles faces, wardrobe, room, light, the position of every object at the first instant, and the phase of everything that is about to move. The move, its timing and its endpoint belong to the motion prompt (Chapter 14).
A house rule of 18 July 2026 divides the work for image-to-video: full verbal description is mandatory when a call establishes or changes pixels (text to image, sheet and anchor generation, text to video, image or video editing). In ordinary image-to-video the approved source frame owns composition, appearance and identity, and the motion prompt names what to preserve and adds only motion, timing, physics, endpoint and surgical negatives. So whatever the frame does not show the model invents, and whatever is wrong in it the clip animates.
There are three ways to make a keyframe, and they differ by what already exists. The complete-shot start frame makes the whole shot in one frame. The anchored keyframe builds a shot around a recurring person from their signed anchor, and includes the speaking frame and the start and end pair. The contact state is the frame before a touch. The freeze (9.4) governs all three.
The complete-shot start frame
One image that already resolves the shot's appearance, its composition and its first physical state: an insert, a product shot, a simple reaction, an environment. A shot with no recurring person needs no anchor and no sheet. Do not use it where the motion will reveal what no picture shows, such as a turn to profile, a garment coming off or a reverse angle: prepare that view first (10.14).
How a complete-shot start frame is made
Write the first visible instant: the phase of every system that will move, as positions (9.4), and the gap before any contact.
Write the frame at the grade it needs: finished for a frame that will be in the film, test to prove a route.
If a person or a product appears, attach the references in order, each with one job and one fence (Chapter 10): "Image 1 supplies the exact bottle: its silhouette, cap and label proportions; it does not supply its background or light".
Generate one frame at the video route's aspect and resolution. Inspect it in this order: identity and product geometry; the state of each hand and the framing; the phase; then light and material.
Repair only the defect, by a one-change edit from the last good frame. Never repair the mood.
Record the start state in one sentence, and the mid-action status; sign; hand on the frame with a separate motion instruction.
Write the phase, not the action. "Her fingers do not yet touch it" makes the coming reach possible; a hand already on the product leaves the clip nothing to do; a future verb ("she reaches") leaves the model to choose the phase. Frame wide enough to keep the evidence the action needs: counter-height framing that holds the product, the hand and the face together protects a reach. Keep the action's future out of the still, and leave room in the frame for the move: a frame packed to its edges gives the camera nowhere to go.
Anchored keyframes
Every image-to-video shot with a recurring person is built from that person's signed anchor. At finished grade the prompt names each attached image by number and name, gives it one job and fences what it must not bring; then comes the locked identity clause; then the full still grammar of this chapter (10.5 gives the pattern). The keyframe is where the manifest is spent.
How an anchored keyframe is made
From the shot table, write the start state: where every object is, where the eyes are, and the state of the mouth.
Attach the anchors in order, each with its role and fence, and write the phase of every system that will move.
Generate at the video route's aspect and resolution. Check the face at 200 per cent against the signed anchor, and the phase and the start state against the motion prompt, before any money goes on video. Sign.
With two principals in one frame, the likeness discipline doubles and the blocking becomes numbers. Attach two identity sheets, write each face from its asymmetries, and fix the instant as three positions: her gesture roughly a third through its arc with the fingers beginning to open, his weight mid-shift back onto his heels, his gaze mid-travel from her hand to her eyes; a metre of counter between them; contact kept off by an exclusion.
Speaking frames
A speaking frame is the first frame of a shot whose mouth will be made to speak. Each project decides at the start how the line is delivered (Chapter 22): either the exact take must ship, and the mouth is fitted to it, or a new performance is acceptable, and a video model performs the line. The frame serves both routes. In the first, it is the mouth the fit starts from. In the second, it is the mouth the model starts from, and the model does the moving. The rule in either case: the easiest frame to sync is not necessarily the prettiest keyframe. Design it for the mouth.
The face is large enough to judge, but not an extreme close-up that magnifies every mouth artefact.
Mouth, chin and cheeks are unobscured, and the lower face is evenly lit; name the surface that bounces the light.
The mouth state is written into the prompt: lips neutral or barely parted, both corners visible and level, front teeth just visible if you want them seen ("her lips barely parted, halfway through a word, the jaw still and the brow level"). State the mouth as a measurement where you can ("the corners of her mouth lifted barely two millimeters") and the gaze as an angle ("thirty degrees to camera-right").
Do not bake a speech mouth into the frame: no wide-open vowel, no speech already under way. The line begins in the clip.
One speaker; any listener is outside the frame or visibly still.
No hand, cup, smoke, veil, microphone or prop crosses the mouth.
Leave the shot a landing: after the line the mouth closes, the breath releases, the gaze changes or holds, the camera settles. The landing belongs to the motion prompt, but the frame has to leave room for it.
Contact states: the frame before the touch
When an action transfers weight, possession or contact (a handover, a reach, a hand arriving on a box), the start frame shows the state before contact, with every supporting hand readable. A frame that already shows the hand on the object leaves the clip nothing to do. A loose instruction ("two sisters exchange a lunchbox") leaves undecided who owns the object, where the support is and whether the transfer has begun.
Allocate identity by screen side, support by named points on the underside, and the moment before contact by a visible gap. Then say who still carries all the weight. A frame in which the receiver already holds the object is never the start of the transfer.

Figure 9.4 — The frame before a handover (Example 9.2). Each person owns a screen side; each supporting palm has a named point; the receiving hand waits below the free side with a visible gap; the giver still carries all the weight; and the frame is wide enough that every hand and the whole box can be counted.
How a contact state is made
Give each person a screen side, and each hand a support point.
State the separation before contact, and who carries all the weight.
Frame wide enough (hips to above the heads) that every necessary hand and the whole prop are visible, with darker clothing or ground behind the fingers, because fingers read against contrast.
Attach the references in order (people, then the prop; a rough photograph of the intended grip if you have one).
Generate. Count the hands, trace each wrist to a person, check that the supporting hands could really carry the object, and check any hinge or latch against the real prop. Only then judge the acting. Repair one hand at a time, and sign.
Write the owner-of-weight sentence for the video: "receiver closes the gap, supports the box, then giver releases". The order of release is the motion prompt's.
Research exemplar · Contact state · Nano Banana Pro, 16:9, 2k, three pictures in order · written in the research, never generated
Example 9.2 — a handover, before contact
Image 1 is the younger sister and supplies her face and blue cotton shirt. Image 2 is the older sister and supplies her face and cream cardigan. Image 3 supplies the green lunchbox, its hinge, latch and proportions. Create one photographic frame just before the older sister takes the box. The younger sister stands on screen left, holding the closed box level at waist height with both hands: her left palm supports the near-left underside and her right palm supports the far-left underside. The older sister stands screen right. Her nearer hand reaches toward the free right underside but remains visibly separate from it; her other hand rests beside her hip. The younger sister still carries all the weight. Both look at the approaching hand, not at camera. Frame them from hips to above their heads so every necessary hand and the whole box are visible. Soft window light from the hall entrance reveals the fingers against darker clothing. No hand crosses another hand; the lid remains latched.Why it works: every line is a physical condition you can check, and nothing is left for the model to choose: who stands on which side, which palm supports which underside, the gap, and who still carries the weight.
Copy the roles and the framing: each image supplies one thing (a face and a shirt, a face and a cardigan, a box and its hinge and latch); the frame runs from hips to above the heads so every necessary hand and the whole box are visible; the light separates fingers from dark clothing.
Grade: this is the contact physics; a finished frame wraps it in the twelve elements.
Start and end pairs
Pin both ends only when the ending is the point: an arrival at an approved composition, a transformation between two locked states, a reveal, a loop. Otherwise the start frame is enough, and the motion prompt carries the endpoint (Chapter 14). Three rules govern a pair.
The two frames must be relatives: the same subject, scale family, lens and light logic, aspect and resolution, made from the same identity payload. A close-up to an aerial in five seconds asks the model to invent the journey, and it warps. Make the end frame from the start frame by a one-change edit (10.13), so that the only difference between them is the change the action makes: "same identities, wardrobe, café, fixed camera, light, table, ticket, cups and screen sides. Only Adult A's right hand has travelled to grasp the near edge of the ticket; Adult B's hand has released". The end frame is itself an approved still; a pair never launders an unapproved composition into the film. Make the middle plausible. Reject a pair that would make the model invent a cut, a change of lens, a change of wardrobe or a spatial jump inside one interpolation, and inspect the middle of the clip and not only its ends. A proposed end that is a handheld close-up in changed wardrobe against a wide static start is not a pair: redesign the end at the same viewpoint and wardrobe, or make it a separate shot with a motivated cut. When a shot follows a clip that already exists, build its start frame from the accepted clip's last state, not from the plan.
What goes wrong with a keyframe
You see | Why | Smallest fix |
The clip performs no action | the keyframe shows the end state | an edit back to the first instant, before any video re-roll |
The wrong person speaks | a second face in the keyframe | move the listener outside the frame, or make them still |
Blurred limbs or a warped frame in the clip | an open verb, or an impossible contact, survived in the still | rewrite it as positions; make the contact possible |
The mouth is already speaking in the first frame | a speech mouth was baked in | lips neutral or barely parted; the line begins in the clip |
The mouth is lost in shadow | the lower face is unevenly lit | light the lower face evenly, and name the surface that bounces the light |
Before you sign a keyframe
The frame is the first instant of the shot, not its end; for a handover, the state before contact.
Every moving system has a phase, written as positions and participles, with its direction readable; no open verb, no camera-movement word.
Every frozen system in the shot record is also in the prompt, and the start state is written in one sentence.
Contacts are readable and possible; the hands are counted and each wrist traced to a person.
If the shot speaks: one face, lips neutral or barely parted and written into the prompt, the mouth unobstructed and evenly lit, any listener outside the frame or still.
The frame leaves room for the move, its edges are named, and it was made at the video route's aspect and resolution.
9.11 Boards and key visuals
A board is several panels in one image, for review, for a cheap exploration of the angles on a product or a location, or as a storyboard image for Seedance 2.5, whose maker asks for fifteen panels or fewer and treats the board as a high-level plot reference (17.2; checked 30 Sep 2026). A board is for the eye. It is never a start frame.
A grid is a crop factory at most. A grid hands the model several chances to grab the wrong face, at a fraction of the resolution for each view. Generate it upstream, crop each useful panel into its own file, inspect the crop for softness and contamination, and leave the grid out of the generation payload. A panel is a fraction of the frame: one cell of a two-by-two grid is a quarter of the frame, and used as a start frame it hands its softness to every clip made from it. Treat a chosen panel as a candidate and rebuild it at full resolution before it becomes an input.
From grid to production single
Generate the review grid at the video aspect, and count the panels: a request for six can come back as seven.
Choose a panel and crop it in an image editor, without generation. Asking the model to "isolate" a panel full-frame is a new generation, and is checked like one.
Attach the crop as composition only, with the real product or identity picture as the authority for detail: "rather than inventing detail from the small grid panel".
Generate one single at the delivery aspect. Inspect asymmetric features, reflections and contact with the ground; resolve false details before anything is animated.
Ask for no text, numbers or labels on a board; the model may paint them into the panels. Never take a product's truth from a grid: four attractive views can carry four different badges.
A key visual is a picture that carries an idea for a treatment, a deck or a poster, with room left for type. The picture and the type are two layers. The editorial layer (titles, subtitles, supers, end cards, logo lockups as graphics) is never generated; it is composited in post from real assets (10.12). For a layout-led study with type in it, use GPT Image 2.5 (Chapter 12); the type that ships is set in layout either way. A concept-stage deck may use references or clearly labelled placeholders, and does not generate apparent final keyframes before the visual system and the rights are approved (Chapter 4).
Ask for a quiet zone as a plain surface, not as an absence. A surface (shadowed plaster, black glass, pale sky, dark limestone) gives the model something to draw; "empty space" gives it nothing. Write it as "the wall's upper left third smooth, shadowed and bare, with nothing on it".
Make each deck format its own frame. A 4:5 page is a new composition with the quiet zone moved, not a crop of the 16:9. A poster idea can rest on one decisive physical interaction; check that the interaction is physically right before you judge the mood, because a hand growing out of a neck fails however good the face.
Finishing happens after a still is signed, and it never fixes a face or a label, because a finishing step invents detail. Keep the native master, the file exactly as the model returned it, whatever is made from it. Upscale only if the delivery needs it, and prefer a slightly softer stable result over a nominally sharper one that damages the product's truth (Chapter 30 teaches the order, Chapter 32 the tools). If you know in advance that the still must be large, regenerate at the larger size; upscale only a signed frame you cannot regenerate. A transparent element (a swipe of cream for a type card, a prop) comes from GPT Image 2.5 with the background set to transparent, and its alpha is checked over black, over white and over a saturated colour (Chapter 12); a real product is cut out by a matte drawn from its photograph in post, never generated.
9.12 Signing and handing on
You sign a still on the file, not the prompt: at the size it will be seen, at full size, and against the prompt element by element (9.8). Then you record it, so that anyone on the crew can find it, rebuild it or build from it. Beside its row in the shot table, a frame carries two records. The shot record is written before the prompt and completed at signing; Chapter 8 teaches each field. The run record holds what happened: the exact job.
The shot record's fields are intention, parameters (aspect, resolution, model, the pictures attached by name and in order), reference strategy, continuity anchors, source-lock check, anti-AI watch, mid-action status, revision levers and the declared length band. Beside them it keeps, never pasted, the reason for every planning number (why 3:1, why 3200K against 5600K) and the palette plan. For a signed anchor, the continuity anchors are three to five locked facts that every later frame is checked against. Mid-action status is the one field the prompt must repeat, as positions. Revision levers turn an 80 % right frame into a named edit instead of a re-roll: "hold everything; raise the tunnel practical's warmth and its spill on her calf" is one.
The run record says what happened: the request, the model and settings, the inputs, the parent, the prompt version, the job, the file with its checksum and size, the cost and the verdict. What the next frame must be checked against is a fact about the frame, so it lives in the shot record, in the continuity anchors: for a signed face, the short list every later frame will be judged against (the left upper lid fractionally heavier than the right, the slight leftward deviation of the nose at the bridge, the stronger left jaw, the receding hairline, the dark wool suit, the loosely knotted tie). When a later frame looks "slightly off", this list tells you what moved.
From here, the frame becomes other frames: Chapter 10 shows how to use it as a reference without its room and light coming along, and how to change it. Chapters 13 and 14 turn it into motion; Chapter 22 makes it speak; Chapter 29 cuts it.
Open questions
Where in an action to freeze. The 20 to 40 per cent band rests on a house rule and on finished practice, not on a maker's measurement. Start there and adjust by what the clip does with the frame.
Whether a host platform's image tool needs an operation phrase. Google warns that a chat model may answer in text unless asked to create an image. If a tool ever returns text, add "Create a photograph of …" ahead of the medium.
How a model reads a camera height and distance in real units. No maker publishes it. Write the visible result beside every number and judge the returned frame, not the number.
What to remember
The model is a literal photographer with no memory: everything it needs must be in this prompt or in a picture attached to this job.
Decisions have three homes: the shot record (what you mean and why), the prompt (what a camera would see, with numbers beside their results), the settings.
The finished grade is the standard: twelve elements in their fixed order, in one paragraph. The test grade proves a route and is never passed off as a finished frame.
Freeze the action 20 to 40 per cent in, as positions and participles; write into the prompt every system the record freezes; leave room for the move.
The finish describes capture; delivery grain and halation are added last, in post. At most five exclusions, then the closing line.
Two attempts, then change the lever: an edit from the signed parent, a composite in post, a new picture, another tool.
A keyframe owns everything that exists; the motion prompt owns everything that changes. A speaking frame carries the mouth state; a contact state shows the gap.
Sign on the file, at both sizes and against the prompt; record the frame so the next one can be checked against it.


Comments